Seat Selection
Role: Box Office Staff, Administrators
The seat map interface is used whenever creating or modifying orders for reserved seating performances. Understanding how to navigate and use the seat map efficiently is essential for box office operations.
Navigation: Stagemgr > Orders > Ticket Orders > New Ticket Order > [Select Reserved Seating Performance]
Overview
The seat map interface provides a visual representation of the venue layout. It displays every seat in the house, color-coded by status, and allows staff to reserve and release seats in real time during order creation.
Seat Map Display
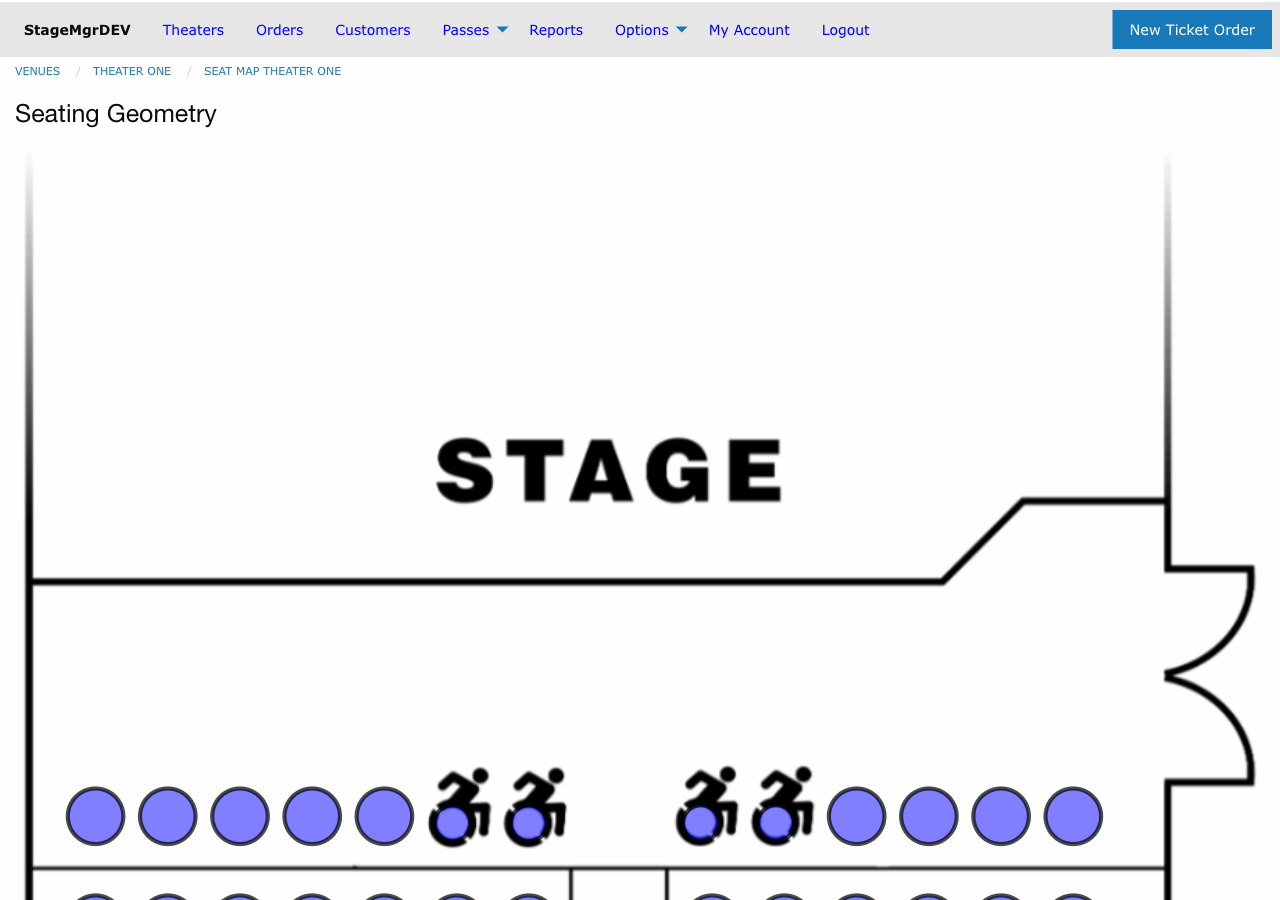
Seat Status Colors
| Color/Indicator | Meaning |
|---|---|
| Available | Seat is open and can be selected |
| Selected | Seat has been selected for the current order (highlighted) |
| Occupied | Seat is sold or assigned to another order |
| Held | Seat is on hold for another order or reservation |
| Wheelchair | Designated wheelchair-accessible position |
| Unavailable | Seat is blocked or out of service |
Navigating the Map
The seat map displays the venue from the audience perspective (stage at the top). Sections, rows, and seat numbers are labeled. For larger venues, you may need to scroll or zoom to locate specific seats.
Selecting Seats
Reserve a Seat
- Locate the desired seat on the map
- Click the seat to select it
- The seat changes to the Selected indicator
- The seat is temporarily held for your order while you complete the form
You can select multiple seats by clicking each one individually.
Deselect a Seat
- Click an already-selected seat
- The seat returns to Available status
- The temporary hold is released immediately
Temporary Holds
When you select a seat on the map, it is placed in a temporary hold for the duration of your order creation session. This prevents other staff members from selecting the same seat simultaneously.
Session Timeout
Temporary holds are released if the order form is abandoned or the session times out. Do not leave an order form open indefinitely with seats selected, as the holds will eventually expire and the seats may be claimed by another order.
Assigning Ticket Classes
Ticket classes are assigned at the moment a seat is clicked, not as a follow-up step. Clicking an available seat opens a popup that lists the ticket classes available for the performance:
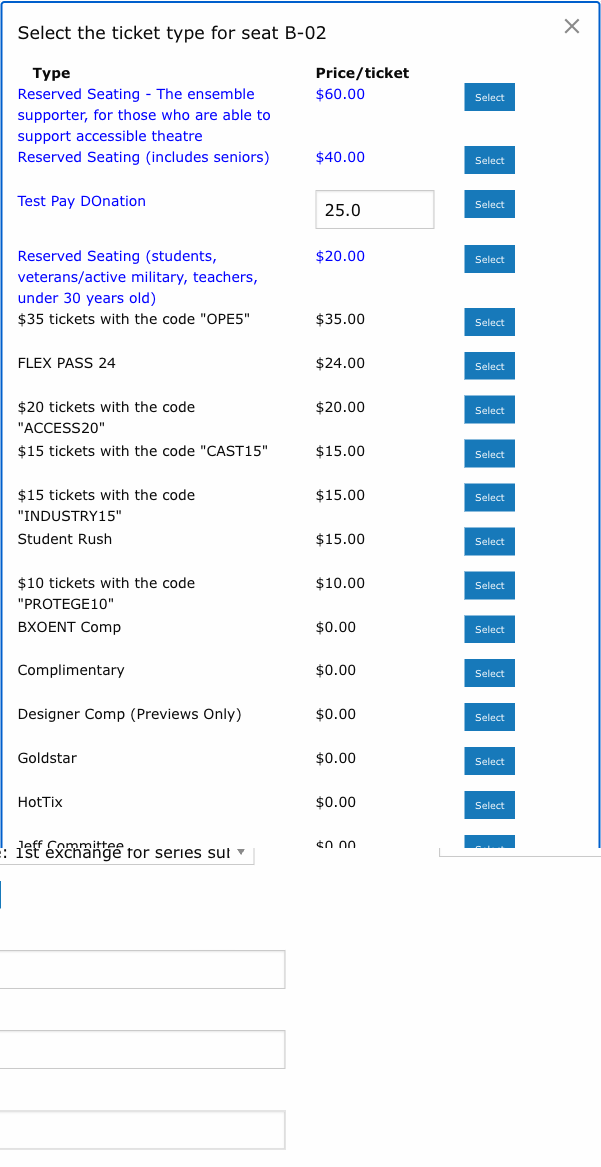
- Click an available seat on the map.
- The popup shows each eligible ticket class, its price, and a Select button.
- Click Select for the appropriate class. The popup closes, the seat is reserved with that class, and a row is added to the Selected Seats list.
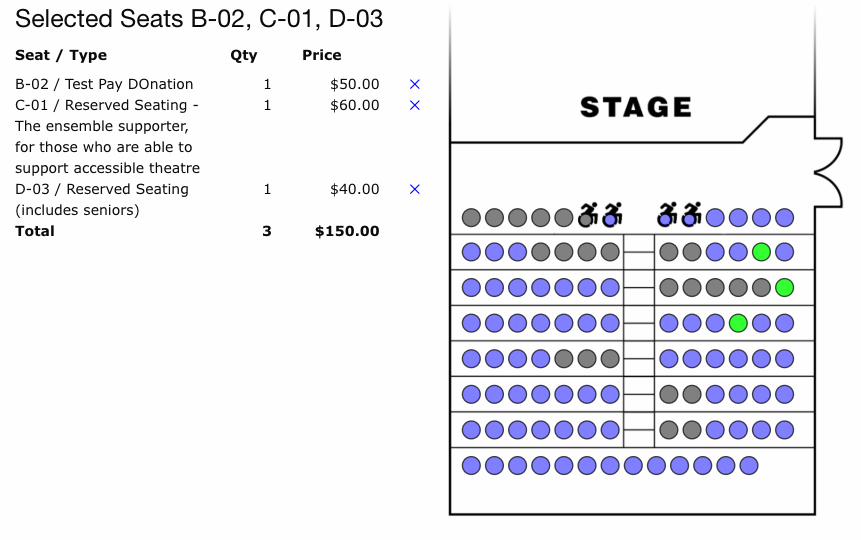
- The total quantity and order total update live as seats are added.
The Selected Seats list shows one row per seat -- not one row per ticket class. Each row displays the seat label, the class assigned to it, a quantity of 1, the price, and a remove (×) button:
| Example Ticket Class | Typical Use |
|---|---|
| Adult | Standard full-price ticket |
| Senior | Discounted rate for seniors |
| Student | Discounted rate for students |
| Child | Discounted rate for children |
| Comp | Complimentary ticket (no charge) |
| Donation / Pay-What-You-Can | Buyer-chosen price (see below) |
Per-Seat Donation Pricing
Ticket classes configured with a Donation type (often labeled "Pay-What-You-Can" or similar) display a price input in the popup instead of a fixed price.
- Type the desired amount in the price field.
- Click Select. The seat is reserved with that custom price.
- The Selected Seats row shows the override price for that specific seat.
Because each seat carries its own donation override, two seats sharing the same Donation class can be priced independently in the same order -- one buyer might pay $15 for their seat while a companion pays $35 for theirs.
Web-Visible vs Back-Office Classes
On the admin new-order page, the popup lists every ticket class for the performance, including back-office classes (comps, internal codes, etc.). On the public ticketing page, the popup is automatically limited to web-visible classes so buyers never see staff-only options.
Removing a Seat
Selected seats can be released two ways:
- Click the seat on the map again -- it returns to Available and disappears from the list.
- Click the × button on its row in the Selected Seats list -- same effect.
The total quantity and order total update immediately.
Wheelchair and Accessible Seating
Wheelchair Positions
Wheelchair-accessible seats are marked on the seat map with a distinct indicator. These positions are designed for patrons who use wheelchairs.
- Locate the wheelchair-designated positions on the map
- Select the wheelchair seat(s) as needed
- Companion seats adjacent to wheelchair positions can be selected for the patron's companions
Wheelchair Conversion
Some venues allow standard seats to be temporarily converted to wheelchair-accessible positions when needed. This is managed through the seat map configuration and is not typically done during order creation.
Know Your Venue
Familiarize yourself with the location of all wheelchair-accessible positions in your venue. Patrons requiring accessible seating should be directed to these designated areas.
Releasing Held Seats
If seats are currently on hold (from a hold order or another process), they can be released back to available inventory:
- Held seats appear with the Held indicator on the map
- If you have permission, you can release a held seat by selecting the appropriate action
- Released seats immediately become available for selection
Releasing Holds
Releasing a held seat removes it from the hold order that reserved it. Only release holds when you are certain the original reservation is no longer needed.
Best Practices
Filling the House
When patrons have no seat preference, follow these guidelines for selecting seats:
- Start from center -- fill center sections before sides
- Fill front-to-back -- unless the patron requests otherwise
- Keep groups together -- avoid splitting parties across rows or sections
- Leave accessible seats open -- do not assign wheelchair positions to non-disabled patrons unless the house is nearly full
Handling Seat Conflicts
If two staff members attempt to select the same seat simultaneously:
- The first selection creates a temporary hold
- The second staff member will see the seat as Held or Occupied
- The second staff member should select a different seat
- Temporary holds resolve automatically if the first order is not completed
Large Group Orders
For large groups requiring many seats together:
- Identify a section with enough contiguous available seats
- Select seats row by row to keep the group together
- Assign ticket classes after all seats are selected
- Use the Notes field on the order to record group details
Troubleshooting
| Issue | Resolution |
|---|---|
| Seat appears occupied but patron says it should be available | Check the order assigned to that seat; it may need to be refunded or canceled |
| Cannot select a seat | Verify the seat is not held, occupied, or blocked. Check permissions. |
| Seat map is not loading | Verify the performance has a seat map assigned. Refresh the page. |
| Temporary hold expired | Re-select the seat. If it was claimed, choose an alternative. |